


Assembly
Remove packing material
Rotate stem (attached to bicycle) vertical
Insert handlebar side of stem into stem
Pedal Installation
⚠️ Pedals are side specific, see axle for designation

Add grease to both pedal threads with included grease pack
Attach left pedal to left crank and rotate counter clockwise with included pedal wrench
Attach right pedal to right crank and rotate clockwise with included pedal wrench
⚠️ Both pedals tighten by rotating towards the front of the bicycle
⚠️ Please do NOT use pedal washers when installing pedals. Pedal washers provide minimal benefit, and if not installed correctly will cause damage to your crankset and bicycle. Some bikes need them and some do not. Your bikes do not need them so please do not use them.
⚠️ It is best to re-tighten the pedals after 2-3 rides when new
Basket Installation
Please go to the following page: Basket Install
Semi-Fat Operation
Battery
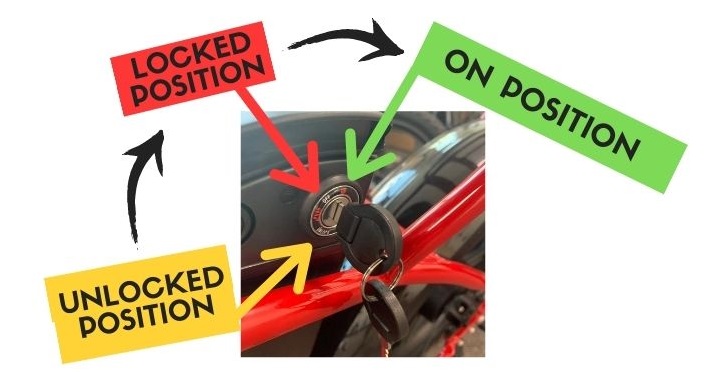
Your battery has 3 positions: Unlocked, Locked, and Locked & On. It can be charged in all 3 positions.
Unlocked: Your battery can be inserted and removed.
Locked: Your battery is locked to the bike, the key can be removed, but the bike cannot be powered on.
Locked & On: Your battery is locked to the bike and it can be powered up.
⚠️ Do NOT transport your bike with the battery unlocked, it can slide up and down damaging the pins on the bottom side.
⚠️ If your key will not turn into the 'On' position, check lock pin at the back of the battery.
⚠️ Only use the included charger to charge your battery
LCD Buttons

Top '+" Button:
Press to increase pedal assistance level
Hold to turn lights on/off
Middle 'Power' Button
Hold to turn bike on and off
Bottom '-' Button
Press to decrease pedal assistance level
Hold for Walk Mode
Settings Menu
Hold '+' and '-' to enter settings menu
LCD Screens

Speed: Speed you are traveling at
PAS: Pedal Assistance Level: 5 Levels to Choose From
Ride Info
Press 'Power' to cycle through info
TRIP1: Trip distance (resets each ride)
VOL: Battery Voltage
RUN TM: How long the bicycle has been operating for the current ride
ODO: Odometer
Gear Shifting & Throttle

Shift Up:
Push back with your thumb to shift to an easier gear
Shift Down:
Press to shift to a faster gear
Twist Throttle:
Twist towards you to activate throttle
Charging Instructions

Battery Charging
Charger light will turn red when charging, green when charging is complete
Charging Tips
Do not let battery go more than 3-4 months without a charge
Suspension Adjustment

Suspension Lockout
Suspension Stiffness
Folding your Semi-Fat
Operating Specifications